

VS Code: GitLens
“Those who know that they are profound strive for clarity. Those who would like to seem profound to the crowd strive for obscurity.” — Friedrich Nietzsche

Photo by Bud Helisson on Unsplash
This tutorial aims to take you through some of the possibilities of the wonderful VS Code extension GitLens. To do this tutorial you will also need the GitHub VS Code extension. I will be doing this on Kubuntu 18.04.
In order to use GitLens we must first create a directory:
mkdir GitLens
cd GitLens
code
Then initialize a git repository within that directory. This can be done within VS Code by clicking on Source Control in the left panel and clicking the appropriate button as shown.

VS Code Initialize Repository
In order to get the following code to build I had to use the Apache Portable Runtime. To install this on my system I had to first enter (at a terminal):
sudo apt install libapr1 libapr1-dev
Let's try creating a C file that will list directories -- essentially a simplified ls. Enter the following code:
//for things like printf
#include<stdio.h>
#include <sys/types.h>
#include <dirent.h>
int main (int argc, char *argv[]) {
DIR *dp;
struct dirent *dirp;
if (argc != 2) {
//Linux typically prints usage statements like this
printf("usage: ls directory_name\n");
return 1;
}
if ((dp = opendir(argv[1])) == NULL) {
printf("can't open %s\n", argv[1]);
return 2;
}
while ((dirp = readdir(dp)) != NULL)
printf("%s\n", dirp->d_name);
closedir(dp);
//Returning zero tells the operating system there were no errors
return(0);
}
I must use some custom settings to do this. You can also configure VS Code to cross-compile for other architectures, but that's outside the scope of this document. My c_cpp_properties looks like:
{
"configurations": [
{
"name": "Linux-x64-gcc-gnu17",
"includePath": [
"${workspaceFolder}/**"
],
"defines": [],
"compilerPath": "/usr/bin/aarch64-linux-gnu-gcc",
"cStandard": "gnu17",
"cppStandard": "gnu++20",
"intelliSenseMode": "linux-gcc-x64"
}
],
"version": 4
}
Note that yours may look slightly different depending on your configuration. My launch.json file:
{
// Use IntelliSense to learn about possible attributes.
// Hover to view descriptions of existing attributes.
// For more information, visit: https://go.microsoft.com/fwlink/?linkid=830387
"version": "0.2.0",
"configurations": [
{
"name": "gcc - Build and debug active file",
"type": "cppdbg",
"request": "launch",
"program": "${fileDirname}/${fileBasenameNoExtension}",
"args": ["$HOME"],
"stopAtEntry": false,
"cwd": "${workspaceFolder}",
"environment": [],
"externalConsole": false,
"MIMode": "gdb",
"setupCommands": [
{
"description": "Enable pretty-printing for gdb",
"text": "-enable-pretty-printing",
"ignoreFailures": true
}
],
"preLaunchTask": "C/C++: gcc build active file",
"miDebuggerPath": "/usr/bin/gdb"
}
]
}
Again your mileage may vary. Note especially this line in launch.json:
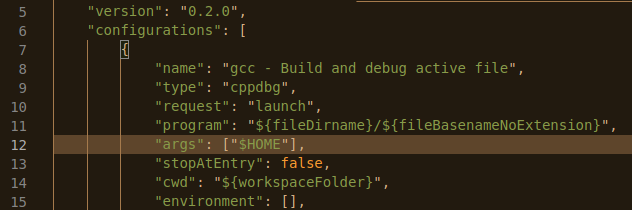
My lauch.json tells my implementation of ls to use the $HOME folder as the argument.
This tells launch.json that we want to use the first command line argument of our little ls program to the $HOME directory. Now go back to our simple ls C implementation file and go to Run > Start Debugging (or mash F5). You should get a listing of your $HOME directory. Mine looks like this:

VS Code partial terminal output when I run my simpleLS.c program.
Now try changing "args" value of the launch.json file to any absolute path on your machine. For example, changing mine to /etc results in this output (remember to switch back to the .c file from launch.json before you start debugging!):

Partial terminal output for simpleLS.c on the /etc folder.
Staging and committing your simple ls C program is documented on this site. A program such as gitk may be used as a means to verify you've staged and committed. We will commit our changes 3 times in this tutorial and that’s going to be important later on. Please do your first commit now.
There is a powerful C function given as part of any UNIX operating system: the stat function. With stat, you can tease out many details about your filesystem. We will examine only two here: file sizes and ownership. Modify your code as in the figure:

C stat function pulling out file sizes.
Do the 2nd Git commit now.
Finally, let's see about getting the owner out of the stat function. To do so, add an ownerID integer and modify your code as in the figure:

C code mods that add owner info.
Commit your changes one final time to Git.
There are a plethora of places we could take our ls program, but we will have to content ourselves with simplicity for now so we can move on with some GitLens features. For more please visit how to geek.
GitLens
Now that we have some code that's in GitHub, we can get to the features of GitLens. They include:
Revision Navigation
View by:
line history
file history
branches
remotes
stashes
tags
contributors
search and compare
Git Command Palette
Interactive Rebase Editor
First install GitLens as directed here. Settings for GitLens are documented here.
Search & Compare
We can search and compare by commit message. In this example I've searched the string for the string "simple":

GitLab’s search by commit message
Additional things you can search by include author, commit SHA, and file.
Interactive Rebase
Rebasing is a feature that is built into git. In a nutshell it allows you to rewire Git's history. Here we will discuss something that once you master can become a powerful utensil in your Git arsenal: Git interactive rebasing.
First, we'll set git to use VS Code as our default git rebase tool. To do so enter the following at a terminal:
cd <path-to-simple-ls>
git config --global core.editor "code --wait"
or, to only affect rebase, set VS Code as your Git rebase editor:
git config sequence.editor "code --wait"
The following assumes you've done the former, that is specify VS Code to be your core editor. If you always want to use VS Code as your default Git rebaser you can add --global to the git config command as documented in the Git book.
Let's start an interactive rebase of git by entering the following at a terminal:
git rebase -i HEAD~2
This tells Git to rewind the HEAD by two and start rebasing at that point. Assuming you've done all commits as instructed, this should result in a VS Code bringing up the screen in the figure.

VS Code GitLens interactive rebase dialog.
Options available to VS Code's GitLens's interactive rebaser include:
Pick
Reword
Edit
Squash
Fixup
Drop
Let's try a squash operation now. This rewrites Git's history to squash one commit into another. To do this select "squash" from the dropdown menu and click "Start Rebase" as shown in the figure.

GitLens squash
This brings up the screen in the figure.

GitLens proceeding to do a rebase operation.
Edit the resulting text appropriately. Note that if GitLens receives only commented lines its behavior is not well defined so make sure you have at least one line without a '#' character. I edited mine as in the figure.

My edits to the GitLens rebaser
Once you are done with your edits close the "COMMIT_EDITMSG" tab in VS Code and GitLens should finalize the rebase. You can verify that the rebase worked as expected using a Git visualization tool such as gitk.

Gitk visualizer for the rebased code
That's it! You now know enough about GitLens to get you started.
Feedback
As always, do make a comment or write me an email if you have something to say about this post!
Credits
Advanced Programming in the UNIX Environment, W. Richard Stevens, 21st Printing, March 2000, ISBN 0201563177
Advanced Programming in the UNIX Environment, W. Richard Stevens, Stephen A. Rago (Third edition). 2013, ISBN 978-0-321-63773-4